Gemma Bridge spends an altogether satisfying day at Leeds Bread Co-op, learning how to make and bake those wonderful doughs.
On Saturday 22nd June I was lucky enough to take part in one of the Leeds Bread Co-op baking days held at the co-op bakery at Penraevon Trading Estate, just off Meanwood Rd. The jam-packed day included learning to make and shape a range of breads, eating homemade pizza and learning the ins and outs of sourdough baking.
What is Leeds Bread Co-op?
Leeds Bread co-op is an independent social enterprise and worker co-op, specialising in slowly fermented, hand-crafted bread and bakes. The bakery was established in 2012 by three passionate bakers who wanted to make tasty bread with healthy, locally sourced ingredients. Since then, Leeds Bread Co-op has grown, thanks to its incredible bread and the support of the local community, customers and a team of passionate bakers.
Like other cooperatives, the bakery is built on strong values. The values of the Leeds based Co-op include democracy, self-help, self-responsibility, equality, equity and solidarity. These values are embodied in the aims of the enterprise. These aims include: helping to increase availability, consumption and knowledge of real bread; providing an ethical and enjoyable place to work; and having a light environmental footprint. The first of these aims is one of the reasons why Leeds Bread Co-op hosts bread baking days such as the one I attended on Saturday.
Tea and toast
On arrival at the warehouse, we were greeted by two super friendly bakers who offered us hot drinks and as much toast as we wanted. I couldn’t resist a doorstop wedge of the Leeds based baker’s famous sourdough, which I toasted and then smothered in butter and jam. For me, this was the perfect way to get a full-on day of bread baking off to a great start. Whilst we were filling up on tasty treats, Ben Mills, a baker with four years’ experience working at the bakery, gave us a brief history of the Co-op and then explained the plan for the day.
Learning to make white sourdough
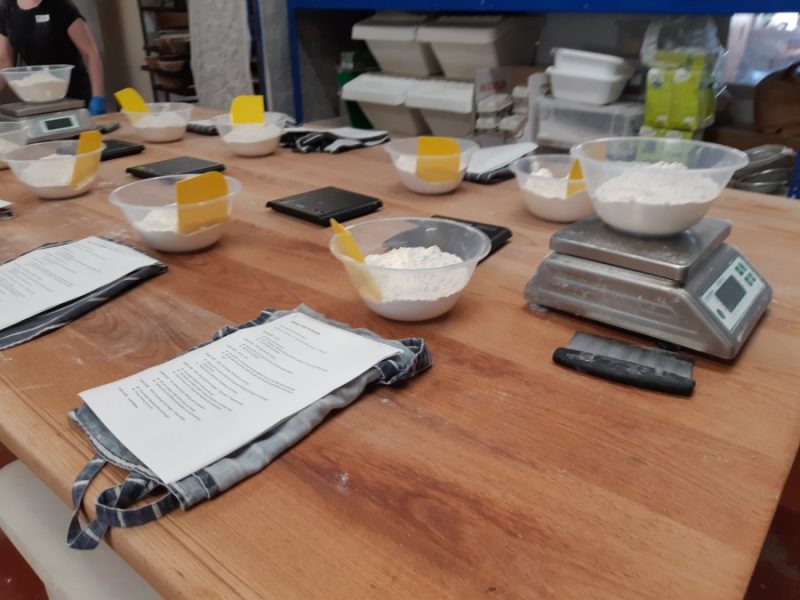
We began the day by preparing a white sourdough. To make this classic bread we were each given pre-weighed out ingredients (to save time) and were instructed to fold everything together by hand. This was a revelation for some of the less experienced in the class, but everyone enjoyed it, and we all agreed that it was a therapeutic (and very messy) way to kick start the day. It also gave us all a chance to get to know one another and ask questions. Once the dough had been mixed, and the preferment added, we left the dough to prove whilst we learnt about the process of autolysis.
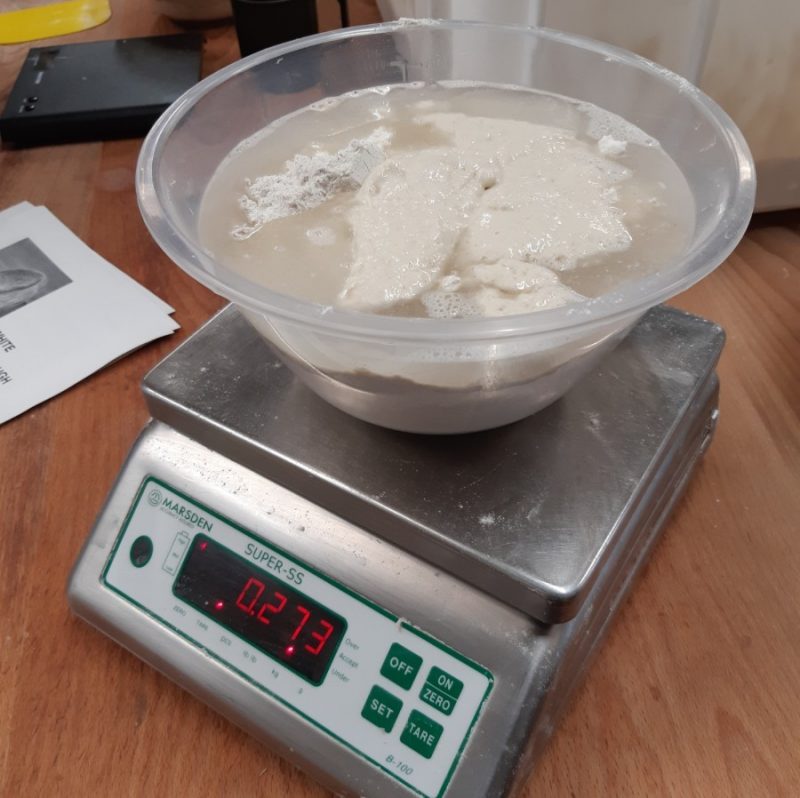
Looking after the starter and learning about mother
The starter is an essential element of sourdough bread. It is what gives the final loaf its characteristic flavour profile and is also what allows the bread to rise, since it is used in place of fast action yeast. Head baker Ben explained the active part of the starter is called the ‘mother’ and this is the sourdough culture which is made from a simple mixture of flour and water. Over time, and with care and attention, the mix supports the development of wild yeasts and acid producing bacteria which give sourdough its distinctive flavour and also make the texture of the bread a little sturdier as well as being easier to digest. The fermentation process that takes place to make the starter is similar to the fermentation process employed in the making of beer and cheese. At the end of the day, we were all given a small portion of Leeds Bread co-op mother to take home and care for, so that we could make our own sourdough.
Vollkornbrot rye bread
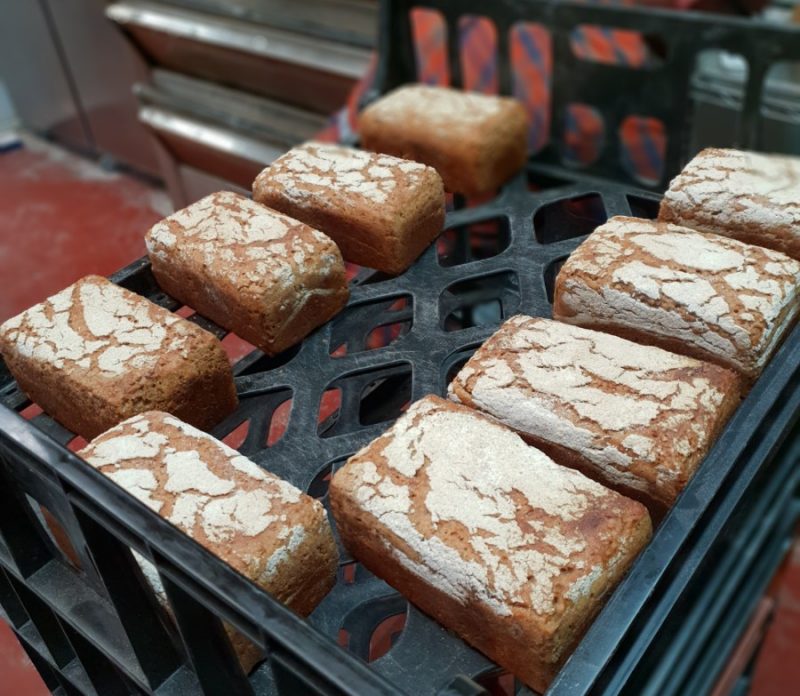
Next up was learning how to create a German-style 100% rye bread, called ‘Vollkornbrot’. Vollkornbrot is a Leeds Co-op favourite, thanks to its sweet flavour, moist texture and a thick crust, which together make the bread ideal for open sandwiches as well as toast. In addition to its unusual look, this bread was made with an equally unusual wet dough and gave us all the opportunity to try out something a bit different. Unlike the white sourdough, this dough was made with soaked chopped rye, which is what gives the bread its interesting texture, as well as helping to ensure it stays moist once baked. Once the dough was prepped, instead of kneeding or folding it as you would with most other doughs, we simply shaped it into a cuboid and placed it into a prepped tin. The dough was then generously dusted with flour (which both allows the baker to know when the dough is proven adequately and also gives the bread its characteristic zebra pattern once baked), and then we left it to prove.
Pizza making and lunch in the sun
Using some pre-prepped dough, we rolled out pizza circles ready to be topped with a range of tasty ingredients. I opted for a combination of red pepper, olives and lots of cheese . Once they were all prepped, they went into the oven, and within 10 minutes we were eating steaming slices of sourdough pizza. Being able to enjoy the fruits of our morning’s labour was amazing and was a perfect way to fuel up. But I mean, who doesn’t love eating homemade pizza in the sun, chatting about bread and sipping on cool, elderflower cordial?
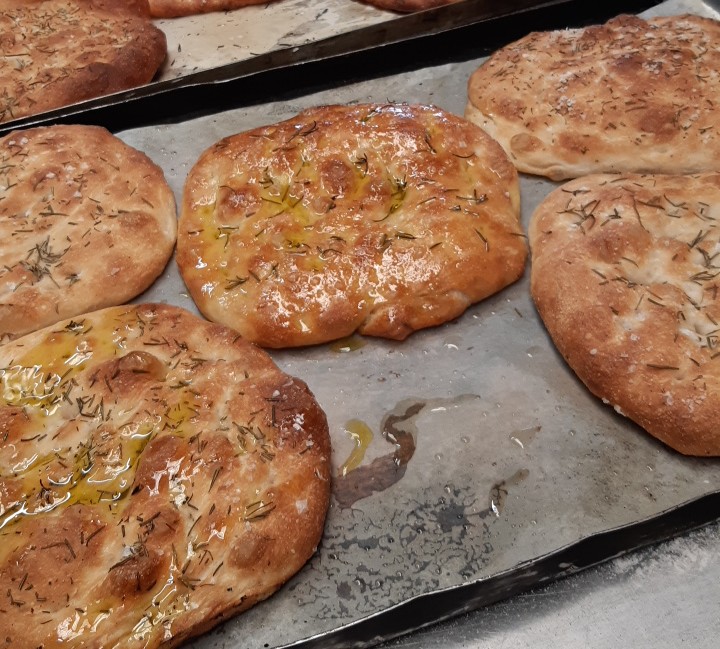
Focaccia making and shaping
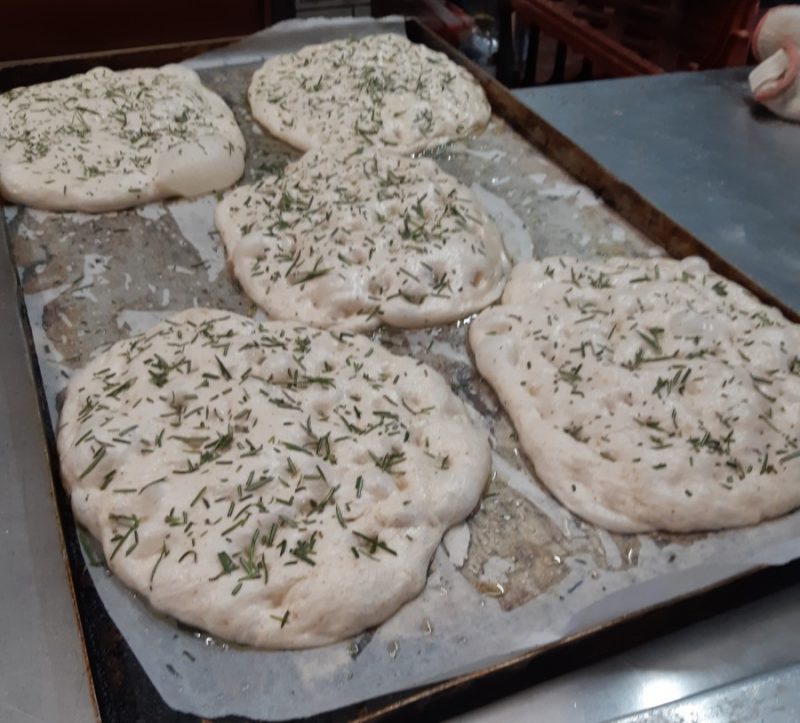
After lunch, it was straight back to work, and we set about making focaccia. The dough felt really different from the other sourdough loaves that we had made, since it was much wetter and squidgy. Once the dough was prepped, we folded and proved the focaccia dough, just like we had done for the white sourdough. However, once the dough had done its initial proving, we placed the prepared dough on a large baking tray and ‘docked’ it, which involved prodding it many times. This not only ensured that the dough did not rise too much during the final stages of proving, but also ensured that when baked, the bread would have the characteristic focaccia holes that would be ripe for absorbing olive oil.
Let the baking begin
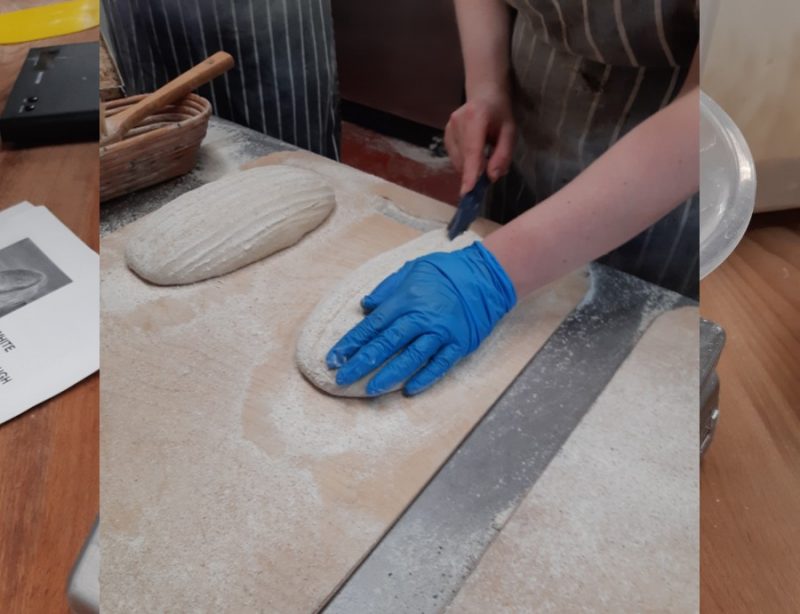
With all of the doughs prepped and proved, we then set about getting them ready for the oven. For the Vollkornbrot, that just meant getting the ovens really hot, but for the other loaves, we had to finish them off before baking. The white sourdoughs needed turning out, brushing down and scoring – which involved slicing into the dough to allow it to rise out. This wasn’t as easy as it sounds, and certainly required some practice! We then finished off the focaccia loves by sprinkling them with chopped rosemary and a generous sprinkling of sea salt.
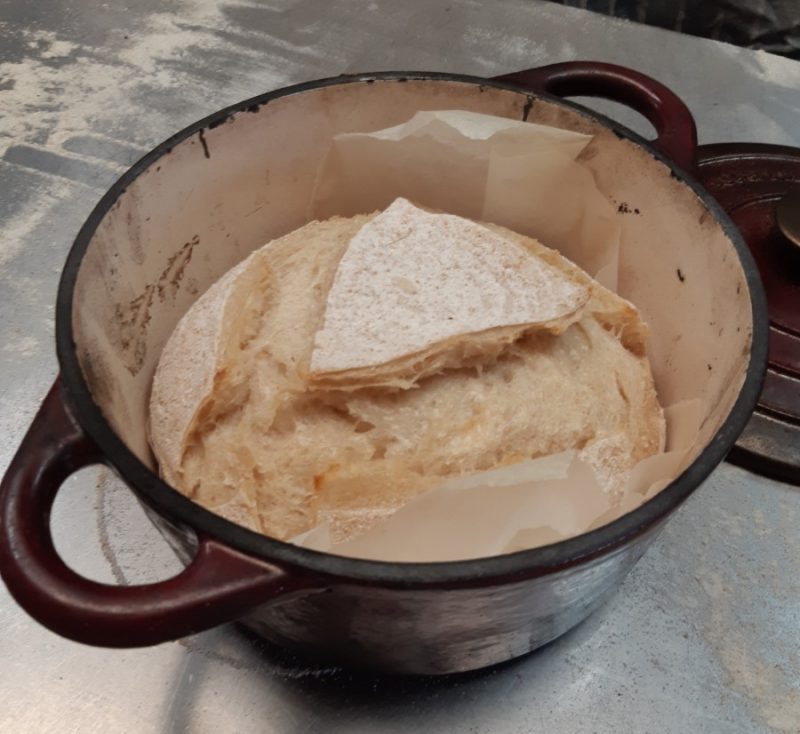
When 4 pm arrived, it was time to bake all of our bread. As we placed them all in the ovens Ben explained how to achieve a professional bake at home, since our ovens are not as hot or controllable as those found in a bakery. He suggested that we try baking our bread in a crockpot or pyrex dish to ensure that the bread would be cooked in a consistently hot environment and to ensure that we could control the moisture levels of the baking process. He said that this allowed him to bake near professional quality loaves at home.
As the bread baked, the heady smell of freshly baked bread filled the bakery. That incredible scent is hard to beat, especially when the bread is homemade, and left us all salivating at the thought of eating our creations.
Bagging up the bread
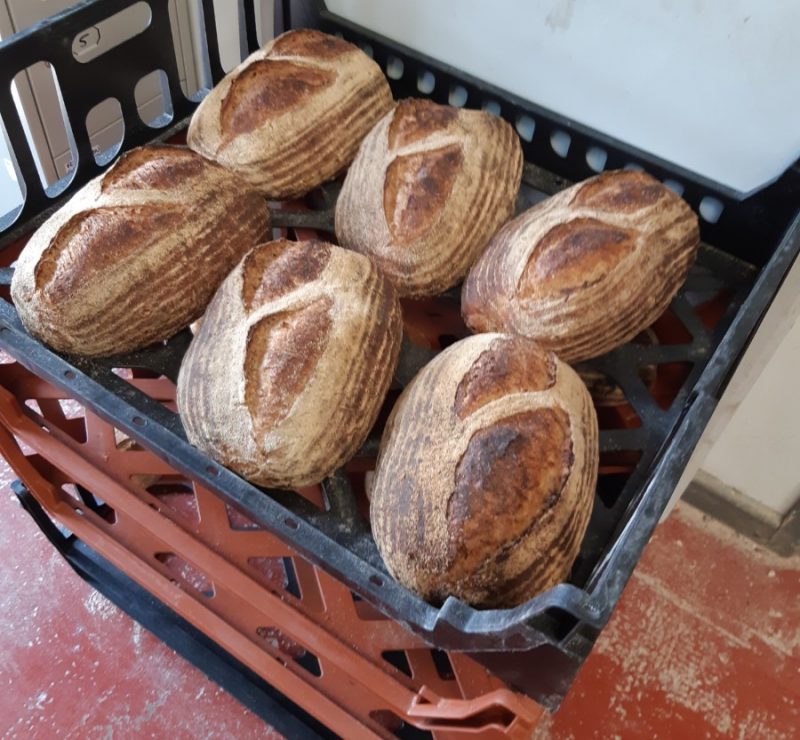
As the day drew to a close, and as our loaves cooled after being taken out of the oven, we all chatted about what a great day it had been and how much we had learnt. Then, once the loaves were cool(ish) we bagged them all up into Leeds Bead Co-op tote bags. We left with big smiles on our faces as well as bags full of our baked creations, including two loaves of white sourdough, a loaf of Vollkornbrot, a focaccia, more than a kilogram of sourdough (which we were advised would make at least 8 pizzas), and a basic white bread dough to bake at home.
Overall thoughts
I absolutely loved spending my Saturday at Leeds Bread Co-op with other people who are equally passionate about bread. I enjoyed being a part of the real bread making process, as not only was I able to learn about the techniques and processes that are used in a professional bakery and how they can be applied at home, but it also shed light on how much care and attention is needed to make real bread! In addition to having two bags full of warm freshly made bread and a range of doughs, I left the bakery with loads of ideas for creating interesting bakes at home.
All photographs by Gemma Bridge.
For more information about the breadmaking classes, to reserve a place or to buy a gift voucher, visit here.